How to Start Editing Again on Imovie
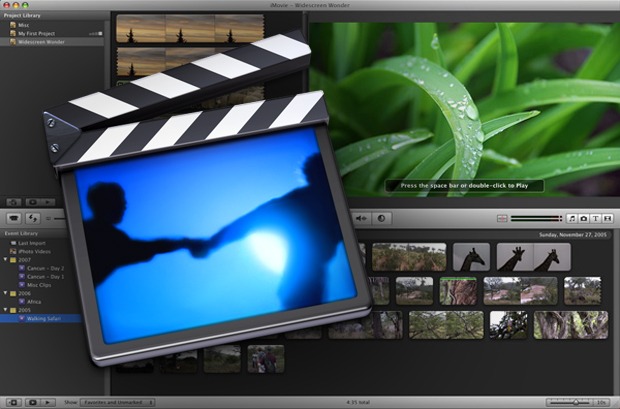
iMovie is a uncomplicated, piece of cake to utilise video editing program that comes free with the Apple operating system (it has no Windows PC version).
Despite its simplicity, iMovie offers many of the same features – dropping clips on a time line, cropping them, calculation transitions between clips, etc. – as more avant-garde video editing programs like FinalCut Pro or Premiere.
Earlier you starting time iMovie, if you lot want to import or capture video off your digital video camera, you first need to connect your camera to the computer, and then iMovie will detect the photographic camera and permit yous to start capturing video clips.
Connecting the Video Camera to the Computer
To capture video off your digital camera you lot need to connect information technology to the calculator with a cable – ordinarily a 6 pin to 4 pin Firewire cable.

Firewire is the standard for Apple computers and a firewire port is congenital into each ane. It also is used by Windows PC computers to practise video capture, although in some cases you'll have to purchase a firewire card to insert into an expansion slot in your PC to create a firewire port.
You connect the half dozen pin finish of the cablevision to the firewire port in the back of your computer. Then connect the other 4 pivot stop to the firewire jack in your digital video photographic camera.
On the Sony TRV900 and TRV11, the firewire jack is on the right front end side of the photographic camera under the greyness flap. It's the jack for DV in/out and has an icon of an I side by side to it.
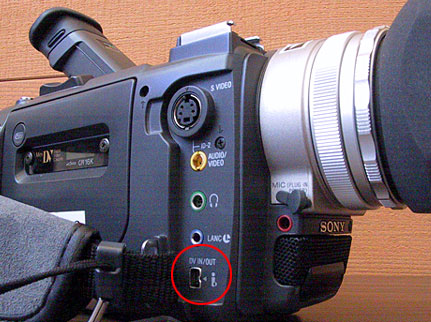
Then plough on the camera and put the mini-DV tape from which yous want to capture video into the photographic camera. Set up the camera to VTR/VCR or playback mode,
When yous launch iMovie it now will detect the photographic camera and allow y'all to command playing of your mini-DV tape using your computer monitor, including selecting clips to capture.
Starting iMovie
Launch iMovie past clicking on the iMovie icon in the Apple menu or dock.
You'll get a prompt asking y'all if yous want to open up an existing project or create a new 1. A projection is a file y'all create on the computer to shop the video y'all capture and then edit.
In this example since we're importing video for the beginning time, click on Create Project.
Give your project a name and store it on your reckoner's hard drive or on a portable firewire bulldoze (y'all should gear up a special folder on your hard drive to continue your projects).
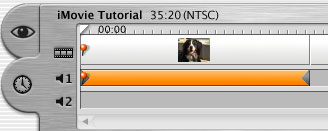
The chief iMovie screen at present will appear on your estimator.
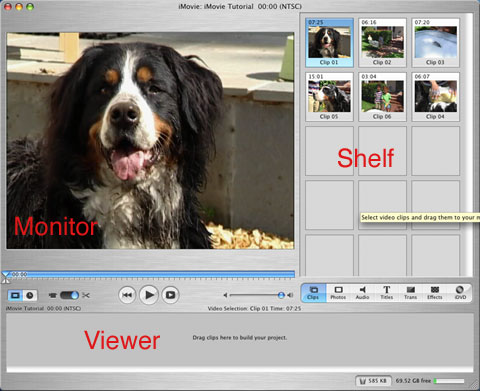
The screen is divided into iii areas:
- At the elevation right is the Shelf. This is where yous'll store clips you lot've captured from your video photographic camera.
- At the bottom is the Viewer. This is where y'all'll arrange your clips into a movie by dragging them down from the Shelf expanse then editing them. The viewer has two dissimilar display modes:
- Clip Viewer, which displays icons of each clip.
- Timeline Viewer, which displays the clips along a horizontal bar that shows you the video and audio tracks for each prune (this is the way y'all'll more often than not use for editing your clips).You toggle dorsum and along between these two views using the switch on the far left just higher up the Viewer that has icons for a film clip (Clip Viewer) and a clock (Timeline Viewer).
- At the top left is the Monitor. This is where you utilise control buttons that resemble the controls on a standard VCR to play your video clips, whether they're still on the camera, captured onto the Shelf area or dragged into the Viewer area.
Using iMovie to Play Video on Your Camera
With your camera attached to the figurer via a Firewire cable, you lot demand to set the blue Mode Switch on the left only below the Monitor section of the screen to connect iMovie to your video photographic camera.
Click on the tiny camera icon on the left to set the switch to the DV mode and connect to the camera.

The other mode to the right is for editing clips (the scissors icon).
At present you can control your camera by clicking on the five buttons at the bottom of the Monitor screen.
These buttons will alter depending on whether you are viewing video that is yet in the camera (when the Mode Switch is ready to DV – the photographic camera icon), or video from the Shelf or Viewer (when the Mode Switch is set to Edit – the pair of scissors icon).
The primary buttons in DV Mode for importing video from the camera are, from left to correct:

- Rewind – The button at the far left that you lot click on to rewind the tape in your camera.
- Terminate – The button second from the left that you click on to terminate play/rewind/fast forrad of the video at any point.
- Play – The larger push in the centre that you click on to begin playing the video at whatever indicate you've set up with the Rewind and Fast Frontward buttons. This button also is a toggle switch – to stop playing the video, just click over again on the Play button.
- Suspension – The button to the correct of the Play push button that y'all click on to intermission the video from playing at any point. When paused, you'll even so be able to see the frame of the video prune at the signal you paused displayed in the Monitor screen.
- Fast Forward – The button at the far right that you lot click on to rapidly move forward through the video in your camera.
- Import – the large button simply above the Play push button that you lot employ to import your video, which we'll become to in the adjacent step.
The principal buttons in Edit Mode are, from left to right:

- Rewind – The button at the far left rewinds to the offset of your pic.
- Play – The larger button in the middle yous click to begin playing your video. This push as well is a toggle switch – to stop playing the video, just click once again on the Play button.
- Full Screen – The button just to the right of the large Play push button will display the video as a full screen on your computer. Press the escape primal to return to the regular Monitor area display.
Shortcut for Playing in Edit Mode – rather than clicking on the Play push, you lot tin simply press the spacebar on your keyboard to play the video, and press the spacebar again to stop the video.
In Edit Mode you also can motility to a particular betoken in your video by clicking on the blue scrubber bar that is at the bottom of the Monitor screen and just higher up the control buttons.

When you click on a clip, information technology will be displayed in the Monitor screen, and a playhead, a tiny gray triangle, volition appear on the scrubber bar merely below the Monitor. You so can click and drag the triangular playhead to the right or the left to move the clip forward or rewind it.
Experiment at this point with the control buttons and the playhead/scrubber bar, moving back and forth between the video clips on your tape until you get the hang of using the command buttons, the spacebar and the playhead to start and stop playing of the clips.
Capturing Video
To capture a video clip – that is to download a segment of the video yous have on your mini-DV tape onto the computer and store it there – you lot kickoff should apply the VCR-like control buttons to get to a point about iii seconds before the beginning of the video segment you want to capture and stop there.
Then click on the Play button to begin playing the video.
Now click on the large Import button just above the Play button to begin capturing the video at that point.

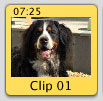
The video you are capturing volition play in the Monitor expanse and you'll also run across an icon representing your captured video clip appear in the Shelf area to the right.
When y'all've captured all of this video clip that y'all want, click on the Import push button again to stop the capture.
And stop the video by clicking on the Play push (or click on the Stop or Pause buttons).
You can and then repeat this process and capture another prune by using the Play/Rewind/Fast Forward buttons to motility to another segment of your video you desire to capture.
At a point several seconds before that video prune, again outset to play the video and so push button the Import button. A new icon will appear in the Shelf surface area to the right for this 2nd prune that y'all've captured. Click on Import and so the Play push button when you're done capturing this second clip.
Note: While you're capturing video, if there's a logical suspension in the footage – such as when y'all stopped recording with the photographic camera off after shooting one scene and then turned tape back on again to shoot a new scene – iMovie will automatically separate that video into two clips in the Shelf surface area.
Creating a Movie
After you've captured the video clips you want to use, you need to gather them into a movie.
To do that, drag 1 of the clips from the Shelf surface area in the upper right of your screen downwardly to the Viewer area. The icon for the prune will announced in the Viewer.
Note: this will motility the clip from the Shelf to the Viewer, and yous will no longer have a copy of the original prune on the Shelf. That means if yous make editing changes to the prune in the Viewer and so decide you don't like the changes y'all made, you won't be able to retrieve the original prune without going back and capturing information technology again off your photographic camera.
So y'all might want to copy, rather than move, clips from the Shelf to the Viewer, leaving a re-create of the original prune on the Shelf in case you need it. To do that, follow the procedure in a higher place for moving a clip, only hold downward the Option key while dragging the clip. The icon for the prune will appear in the Viewer, but the original clip will be preserved on the Shelf.
Notation: On the Mac, Option+elevate always ways "re-create rather than motility" — this trick is handy when managing files in the Finder, copying selected regions in Photoshop, and more.
Now repeat the process for other clips, dragging them down from the Shelf to the Viewer. You should try to practice this roughly in the lodge in which you desire your clips to announced in your movie, although you lot can move them around in the Viewer if you desire to change the order.
You can view the clips you lot've dropped into the Viewer in 2 ways:
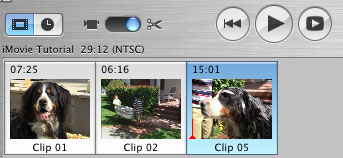
- Prune Viewer, past clicking on the icon on the far left above the viewer area that looks like a frame of film. This view displays icons of each clip, stacking them from left to correct. This mode is used for changing the basic lodge of clips.
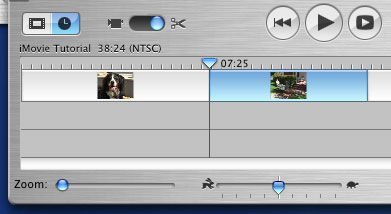
- Timeline Viewer, by clicking on the icon on the far left above the viewer that looks similar a small clock. This mode will let you control in and out points of individual video clips, and besides lets you see sound tracks. Timeline Viewer style is what y'all should use to edit your pic.
You can play ane clip in the Monitor window by clicking on it – its background will turn blue – and then clicking on the play button in a higher place (or pressing the space bar on your keyboard). To stop playing, click once again on the Play push button (or press the space bar).
Y'all can view 2 or more than clips by clicking on each one while holding downwardly the Shift key – the borders around the selected clips will plow blue – and so clicking on the Play button in the Monitor window.
If y'all want to play all the clips, click anywhere outside the Viewer so that no clips are selected, and so click the Play push (or press the space bar).
You also can apply the Curl Bar below the Timeline Viewer to coil to unlike points in your movie.
And you tin can apply the Zoom tool at the lesser left to zoom in on a particular clip past dragging information technology to the right. Or y'all can zoom out to see more of your movie clips by dragging the tool to the left.
Notation: when clicking on clips to play them or to edit the video, y'all probably should uncheck the Edit Book box at the bottom below the Viewer. Otherwise you may accidentally add sound editing points on a prune when yous click on it, and thus could change the volume of the prune at those points.
Cropping a Video Clip
You can select simply a portion of a clip that yous actually want to play in your movie by cropping it – shortening it either at the starting time or at the stop or both – and deleting the unwanted portions of the clip.
Note: If you brand a mistake while editing a prune, just printing the Apple/Cmd key and Z, or in the bill of fare at the top of the screen select Edit…Disengage, and yous'll undo your previous move. You can undo the previous 10 steps.
Annotation: This is not an iMovie-specific pull a fast one on. Cmd-Z always means Undo in Macintosh applications. On Windows, Ctrl-Z does the aforementioned thing.
To ingather a prune, first make sure the Fashion button on the left is in editing style by clicking on the icon on the right that looks like a pair of scissors.

At present select a clip in your Viewer by clicking on information technology.
Notice that a blue scrubber bar appears only below the Monitor area where the clip is displayed. And on the pinnacle of the scrubber bar is a modest grey inverted triangle, marker a signal in the prune. This triangle is called the Playhead.
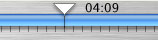
If you pass your mouse over the scrubber bar, you'll see two tiny triangles appear on the far left that are called ingather markers. These are what yous use to crop your video.

Click on the right crop mark triangle and drag information technology to the point where you want the prune to stop. The Playhead also volition move to that point in your timeline.
At present click on the left crop mark triangle and drag it to the point where you want your prune to first. Once again the playhead will move to that point.
You'll notice that the color of the video rail above changes from blue to yellowish as y'all drag. This yellow part is the part of the clip that you're saving.

Now in the menu at the acme of the screen select Edit…Crop.
The bluish parts of your clip on either stop will exist deleted and volition disappear (this is another skillful reason for copying your clips into the Timeline Viewer instead of simply moving them at that place, and so you all the same have the original clip intact on the Shelf.)
Also observe that any clips that are on either side of the clip you cropped also take moved in to butt upwardly against the cropped clip and preserve a continuous timeline.
Deleting or Immigration the Middle of a Clip
You tin delete a portion of a clip, such every bit the middle of information technology, that you don't want to use in your pic by clearing a segment of information technology anywhere in the clip.
Click on the clip to display it in the Monitor window.
And then click in the scrubber bar on the right crop marker triangle and drag it to the end point of the portion of the clip yous want to delete. The Playhead triangle will move to that point in your timeline.
Now click on the left crop marking triangle and drag it to the commencement point of the portion of the clip you want to delete. Once more the Playhead will motion to that point.
You'll notice that the color of the video track above changes from bluish to yellow as you drag. This yellow role is the portion of the prune that y'all want to delete.
At present in the menu at the superlative of the screen select Edit…Clear.
The yellow part of your clip will be deleted and will disappear.
The remaining bluish parts of the clip will snap together to preserve a continuous timeline.
in the Viewer Timeline these two clip segments will be designated as two separate clips.
For example, if you take out the center of Clip No. 1, then the beginning section of the clip you lot preserved will even so exist named Clip No. 1, but the ending department of the preserved clip will be renamed Clip No. 1/i.
Splitting and Deleting Part of a Clip
Yous can split up a prune into two split segments, and then delete i of the segments.
Select the prune in the Viewer to display it in the Monitor.
Click on the bespeak where y'all want to separate the prune. The Playhead triangle will move to that point in your timeline.
Now in the carte at the top of the screen select Edit…Split Video Clip at Playhead.
The clip splits into two clips in the Timeline. If it's Clip. No. 1, it will divide into Clip No. i and Clip No. 1/1.
At present in the Timeline select the clip y'all want to delete, and either press the delete key on your keyboard or in the menu at the top of the screen select Edit…Cut.
Note: You lot can also use this method of splitting a clip to insert a transition in the middle of a clip or add a title to only a portion of a clip. Or you can use this method to split a clip in 2 so yous can move one segment to some other section of your movie.
Grabbing Frames from a Video Clip
If you lot want to catch a single frame from your video to utilise as a still photo (in gild to utilise the picture on a Web folio, for instance), motion the Playhead to the frame you lot want to select.
In the menu at the acme of the screen, select File…Salvage Frame As…
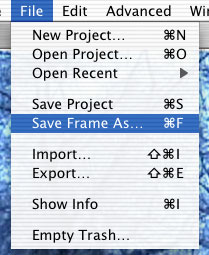
In the dialog box that comes up, type in a proper name for the frame and select the folder into which you want to relieve it.
From the Format picklist, choose jpeg.
Then click on Salve.
Still Frames
If you desire to use a unmarried frame from a video clip in your film – in result freezing the move on a particular image as your movie plays – y'all can grab a still frame from a clip.
To do that, motility the Playhead to the frame you desire to use. And then in the menu at the top select Edit…Create Still Frame.
The yet frame will appear on the Shelf. By default, iMovie will create a still frame that is five seconds in duration (in other words, the same frame or motion-picture show will be displayed for 5 seconds in a motion-picture show).
Drag the still frame from the Shelf to the Viewer just equally you lot would a video clip to add information technology to the Timeline. One time in the Timeline, y'all can change the duration of the still frame past editing information technology with the crop markers, only as you lot would edit a video prune.
Adjusting Sound
You can adjust the overall volume of the audio in a video clip. Or you can brand the audio level change many times within a unmarried clip.
Start cheque the Edit Volume box at the lesser below the Timeline.
And then click on a clip in the Timeline to highlight it.
Brand sure the audio sound box to the far right of the runway for the prune is checked (the sound boxes are underneath a tiny speaker icon). An unchecked sound box mutes the sound.
And make sure the sound level bar to the right of the Play button is dragged far enough to the right and then you tin hear the audio (this bar only adjusts the playback volume of the audio yous hear in the reckoner, non the audio level of the clip itself).
To change the overall sound level of the clip, click on the audio volume slider tool in the lower correct below the Viewer.
Drag your mouse to the left to reduce the sound or to the right to increase the audio. Notice that a sparse royal horizontal line on the clip shifts up or downwardly as you adjust the audio.
You besides can use this majestic horizontal line to arrange the audio to unlike levels at different places within a clip.
Click on the purple horizontal line at whatsoever point and drag the line up to increase the audio from that point on, or drag the line down to subtract the audio. A small circumvolve will be inserted on the line at the point you click on information technology.

Then click on the purple horizontal line at some other point on the clip and once more drag the audio level up or downward from that point on.
In professional person audio editing applications, this process is called "editing the envelope."
If you lot want to clear a point at which you've adjusted the audio, click on the small circumvolve for that bespeak, and in the carte du jour at the top select Edit…Clear.
Separating the Audio Track from the Video
When you elevate a prune from the Shelf into the Viewer, the video and sound announced as a single track in the Viewer. But you lot can excerpt the audio from the video, creating separate tracks for each.
Y'all would do this if you desire to use the video in a prune but with some different audio, such equally voice-over narration describing the video.
Or you would do this if you just desire the audio from a clip and don't demand the video.
Thus if you want to add together voice-over narration to a video prune, y'all could record the narration using the microphone in a video camera, with the lens cap on. So capture the narration prune in iMovie, move the prune to the Timeline, and extract the audio. Delete the bare video runway and elevate the audio track to back-trail some other video in the Timeline.
To separate the audio from the video, select the clip in the Viewer.
Then in the bill of fare at the pinnacle select Advanced…Extract Audio.

In the Viewer Timeline display, you'll see that the audio is separated out and appears as a distinct sound track just below the video track (if your audio was recorded in stereo, then it will announced as two tracks of audio on the Timeline).
You now tin motion the sound track separately from the video by clicking on the sound and dragging it to the left or correct along the Timeline.
You also can edit the sound rails to eliminate some of information technology. Click on the audio clip and move the Playhead to a point in the audio rail. Then in the carte at the top select Edit…Dissever Selected Sound Prune at Playhead. At present click on the segment of audio you lot don't desire and press the Delete fundamental on your keyboard to eliminate information technology. Echo the process to edit other segments of the audio.
And you can change the sound levels on the clip just as you would if it were notwithstanding part of the video clip, past manipulating the purple sound level line.
Or y'all can highlight the entire audio track for the clip and printing the Delete cardinal on your keyboard to eliminate the entire audio portion of the clip (or similarly you lot can highlight the video track and use the Delete cardinal to eliminate it and only preserve the audio.)
Adding Transitions Between Video Clips
To add a transition from one clip to another, first move the Playhead to the point betwixt ii clips on the Timeline.
Then click on the Trans button in the button bar at the bottom of the Shelf area on the right.
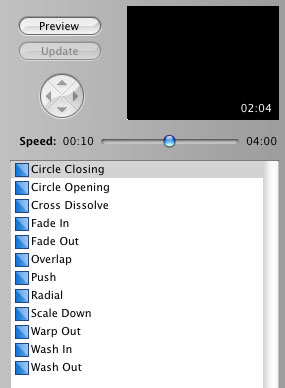
In the window that appears, you lot'll meet a box listing the different types of transitions (each of which has a blue icon).
Select the transition you lot want, such as a Cross Dissolve. A preview of the transition will play when yous click on it so you tin encounter how ane clip fades into the adjacent clip using this particular transition. Or you can click on the Preview button to meet the clips with the transition play in the Monitor to the left.
You can as well adjust the speed of the transition – how chop-chop i clip will transform into the next – past dragging the button on the Speed slider bar. Elevate to the left to make the transition faster, to the correct to brand the transition slower.
For some transitions, you lot also can employ the little cycle to adapt the direction of a item transition (click on the Push transition, for case, to see how you tin can adjust the direction of the transition using the wheel).
When yous're washed with your selections, click on the bluish icon for your transition, drag it down to the Viewer and position it between the two clips where you desire to create a transition (such as where yous placed the Playhead above). Release it and you lot'll observe that a bluish transition clip has appeared in the Viewer between your two video clips.
Y'all'll also run across a reddish line appear nether the clip, with the ruby area moving slowly to the correct. When transitions are added, the affected video must be regenerated, or rendered.
This red line shows the progress of the rendering process. It may take a few moments for the rendering to consummate (specially if y'all selected a long transition between clips, which will accept a longer time to render).
![]()
When the rendering is done, y'all can move the Playhead to the first clip, click exterior of the Viewer Timeline then click on the play button to run into your film play, with the beginning prune now transitioning into the next.
You add additional transitions betwixt other clips in the same way.
To remove a transition, just click on it and press the delete primal on your keyboard.
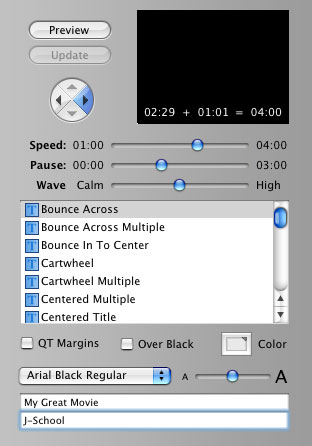
Adding Titles to Video Clips
Titles are a way to add short descriptive text to a video clip, such as the name of a person who is speaking on a prune.
To add a championship, in the Viewer click on the prune to which you desire to add a title.
And then click on the Title push button in the button bar at the bottom of the Shelf area on the correct.
In the window that appears, you'll encounter a box listing the different types of titles (each of which has a blue icon).
Select the title you want, such equally a Subtitle…Subtitle. A preview of the title volition be displayed when you click on information technology so you can come across how information technology will appear on your clip.
At present type the words for your championship into the superlative line of the field at the lesser of the window. For many titles yous as well can type in a subhead in the adjacent field below.
Next select the font mode for your title in the drop-downwards menu on the left that lists the available fonts.
And then select the size of the words in your title by dragging the button on the title size slider only below. Elevate the bar to the left for a small title or to the right for a big title.
Each time y'all brand a option your video clip with the new title will play in the preview pane. Or you can click on the Preview button to see the clip and title play in the Monitor to the left.
You also can click on the box next to the word Color and apply the color palette to pick a color for your championship.
If you desire your title to appear on a black groundwork, rather than superimposed over the video, click on the modest box adjacent to the words Over Blackness.
And if yous plan to export your clips as a QuickTime movie, you tin cheque the small box next to QT Margins to ensure the title fits in the margins of the QuickTime flick.
You can adapt the speed or duration of the title past dragging the blue button in the sliding Speed bar most the pinnacle. Drag to the left to shorten the duration of the time your title volition appear on a clip, or to the right to increment the elapsing of the title.
For some titles, you lot also can use the little wheel to adapt the direction from which a particular title appears on the screen (click on the Wipe title, for example, to encounter how you tin can accommodate the direction of the title using the wheel).
When you're done with your selections, click on the blue icon for your title, elevate information technology downward to the Viewer area and position it just before the clip where you lot want the title to begin. Release information technology and you'll notice that a blue title clip has appeared in the Viewer. This is the portion of your video clip on which the title will appear. The residue of the video, on which the championship doesn't appear, has been split into a second clip.
You'll as well see a ruby line appear under the clip, with the crimson area moving slowly to the right. When titles are added, the affected video must be regenerated, or rendered.
This red line shows the progress of the rendering process. It may take a few moments for the rendering to complete (peculiarly if you selected a long title betwixt clips, which will take a longer fourth dimension to render).
When the rendering is washed, you tin can move the Playhead to the beginning of the clip and and then click on the play button to come across your movie play, with the championship now displayed on the prune.
You add additional transitions betwixt other clips in the aforementioned way.
Note: you will not be able to drag a title to the outset of a clip if yous've already inserted a transition at that place from the previous clip. To add together a championship to a clip after a transition, yous demand to split the clip in ii.
To exercise that, move the Playhead to a signal simply to the right of the finish of the transition. And then in the menu at the height select Edit…Split Video Clip at Playhead. That will split off a 2nd prune right subsequently the transition.
At present you lot can drag a title downwardly and insert it simply before the newly created second clip.
To remove a title, click on the clip that contains the title and in the menu at the top select Edit…Clear. That will eliminate the title but won't affect the underlying video.
Special Effects
Yous can add special effects to a video clip, such as adjusting the effulgence or contrast, skewing the color scheme, or making the prune but black and white or sepia in color tone.
To add special effects, starting time select a prune in the Viewer area.
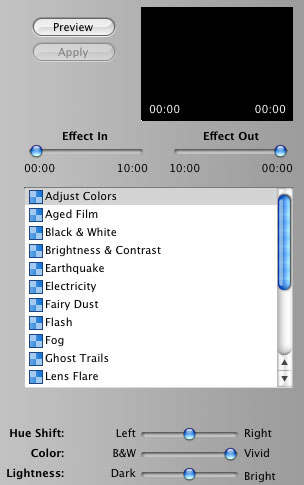
Then click on the Effects button in the button bar at the lesser of the Shelf area on the right.
In the window that appears, you'll see a box list special effects (each of which has a blueish icon).
Select a special issue you want, such as Black and White. A preview of the outcome volition play when yous click on information technology so you can see how it changes the prune. Or you tin click on the Preview push button to see the clip with the effect play in the Monitor to the left.
If you want the effect to fade in after your clip begins to play, elevate the blueish button in the Effect In slider bar to the correct to adjust the timing.
If you desire the effect to fade out earlier the finish of your prune, drag the blueish button in the Effect Out slider bar to the left to conform the timing.
On some clips you can adjust the intensity or other aspects of the effect using the slider bars at the bottom of the window.
To apply the special effect to the clip, click on the Apply button.
You'll also run into a scarlet line appear nether the prune, with the red area moving slowly to the right. When effects are added, the affected video must be regenerated, or rendered.
This red line shows the progress of the rendering process. It may take a few moments for the rendering to consummate (particularly if yous selected a fancy effect for the prune, which will have a longer time to render).
When the rendering is done, you tin can move the Playhead to the commencement of the clip and then click on the play button to see your movie play, with the effect now applied to the clip.
You add together additional effect to other clips in the same way.
To remove an result, click on the clip that contains the effect and in the menu at the top select Edit…Clear. That volition eliminate the effect and restore the prune to its original appearance.
Calculation Photos with the Ken Burns Event
You can add photos to a movie, and use iMovie to create special effects for the photos.
1 popular special event is to pan across a photo or zoom in and out of a photo as it plays in your picture show. This is known as the "Ken Burns result," after the filmmaker who oft used the technique in his documentaries.
Showtime yous need to grab a single frame from your video to use as a still photo.
Move the Playhead to the frame you want to select.
In the menu at the top of the screen, select File…Save Frame As…
In the dialog box that comes up, type in a name for the frame and select the binder into which you lot want to save it.
From the Format picklist, cull jpeg.
And then select the Desktop temporarily to store the file and click on Relieve.
At present open the iPhoto program and drag the jpeg pic you just created into the iPhoto library.
Note: if you lot have a photograph from some other source, such as a digital still photographic camera, that you want to use in iMovie, merely drag information technology into your iPhoto library. It just has to exist in jpeg format (and you can use Photoshop to convert photos to jpeg format).
At present become back into iMovie, and click on the Photo button in the button bar at the lesser of the Shelf area on the right.
You lot should come across a thumbnail of your photograph displayed (or click on Photo Library and navigate to a subfolder in your iPhoto library if you lot put the photo there).
Y'all tin accommodate the time the still photo will be displayed in your movie with the slider bar that has an icon of a hare on one cease for a quick clip of your photo clip, and a tortoise on the other for a longer photo clip.
You also tin can zoom in or out in the photo with the zoom command only above.
When you take the photo ready the way you want it, click on it and drag it down into the video track on your Viewer Timeline.
You then can edit it as you lot would a normal video clip.
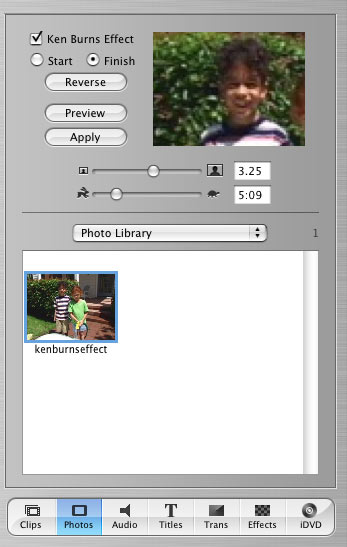
Ken Burns Effect
To add the pan or zoom to your photo clip, select the picture show in the iMovie photograph library and check the box at the top labeled Ken Burns Outcome.
To apply a zoom, check the Outset button and then use the Zoom slider bar to zoom in or out on the photo to the desired view.
Then check the Finish push, and apply the Zoom slider bar to zoom in or out on the photograph to a new view.
The photograph so will open at the offset zoom view, and gradually change to the second zoom view.
To employ a pan, check the Get-go button and move your mouse cursor over the Preview screen in the upper right until your cursor turns into a hand icon. Click and hold downward on your mouse and you can move the photo from left to right or up and downwardly to middle it at a new point.
Then check the Cease button, and again move your mouse cursor over the Preview screen in the upper right until your cursor turns into a hand icon. Click and hold down on your mouse and you tin can move the photo from left to correct or up and down to eye information technology at a second point.
The photo volition open centered at the showtime signal you set and gradually shift to being centered at the 2nd point you lot set.
Y'all also tin combine zooms and pans so yous start out with a full view of a photo, for example, and so zoom in on one element in the photograph.
Finally, you lot can adjust the time the photo volition be displayed in your movie with the slider bar that has an icon of a hare on one end for a quick clip of your photo clip, and a tortoise on the other for a longer photograph clip.
When you accept the photograph gear up the manner you want it, click on it and drag it downward into the video track on your Viewer Timeline.
Y'all'll too run across a red line appear under the clip, with the red area moving slowly to the right. When an upshot is added, the affected video must be regenerated, or rendered.
This reddish line shows the progress of the rendering process. It may take a few moments for the rendering to complete.
When the rendering is done, you lot tin can move the Playhead to the beginning of the prune so click on the play push button to come across your photo clip play, with the Ken Burns Effect at present applied to the prune.
You and so can edit information technology equally you would a normal video prune.
Adding Sound Effects or Sound Recording to a Video Clip
You tin can add special sound effects to a clip from a pre-selected list of common sound furnishings that iMovie provides. Or you can record audio on you computer and add that directly to the iMovie Viewer Timeline as an sound clip.
Sound Furnishings
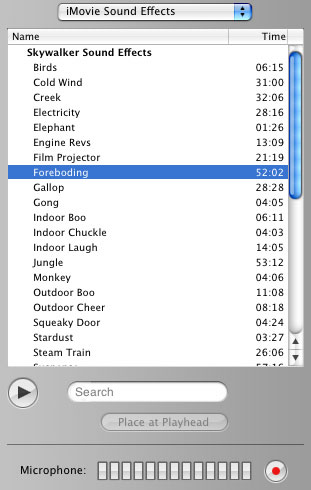
To add sound effects, click on the Sound button in the push bar at the lesser of the Shelf expanse on the right.
In the window that appears, you'll come across a box listing different sound furnishings(each of which has a blue icon).
Select a sound upshot y'all want, such as Standard Sound Furnishings…Difficult Pelting, and so click on the big play arrow below to hear the sound effect.
To add the sound consequence to the Viewer Timeline, click on the blueish icon for the audio consequence you want, agree downward your mouse button, drag the sound effect down to the Viewer Timeline and position information technology in the audio tracks beneath the clip to which you want to add it. Release your mouse button.
The audio volition be added every bit a new audio track for your prune.
(you also tin add the sound consequence past positioning the Playhead in the Timeline Viewer at a point where yous want the sound effect to begin, and then selecting the blue icon for the sound effect and clicking on the Place at Playhead push)
Y'all at present can motility the Playhead in the Timeline Viewer to the beginning of the sound issue sound prune and click on the Play button to see your flick play with the audio effect added to the video.
Each sound consequence has a pre-set duration, but one time it'southward in the Timeline Viewer you tin can edit the sound clip to eliminate some of it. Click on the audio clip and move the Playhead to a point in the audio track. And then in the card at the top select Edit…Split Selected Audio Prune at Playhead. Now click on the segment of sound y'all don't want and press the Delete key on your keyboard to eliminate it. Repeat the process to edit other segments of the audio.
You lot also can change the sound levels within a sound effect audio clip just as you would with any other audio clip (or audio that is embedded in a video prune). See the section on Adjusting Audio.
If yous want to remove the sound effect, click on the audio clip to highlight it and printing the Delete key on your keyboard.
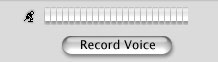
Recording Audio into iMovie
if you take a built-in microphone for your computer or a separate microphone yous can plug into the audio input jack on your computer, you can utilize the Sound section of iMovie to record sound, such as narration, to add to your moving-picture show. The sound will be added direct to an audio rail in the Timeline as you lot tape.
To practise this, connect your microphone into the computer (or just use a built-in microphone if your estimator has 1). Notice that the level of the audio picked up past the microphone is displayed in a bar just below the Place at Playhead button.
Position the Playhead at a point on your Timeline where you want to insert the audio.
Press the cherry record button to the right to begin recording.
A new sound clip will appear on one of the audio tracks in iMovie, with the audio yous're recording automatically inserted into that clip. The clip volition proceed to increase in size as long as you're recording.
To finish recording, printing the reddish tape button again.
Y'all so can alter the audio levels of our recorded clip just as you lot would with any other sound clip (or audio that is embedded in a video prune). Meet the section on Adjusting Sound.
Importing Audio
Y'all can employ iMovie to import audio you have created or audio tracks from a CD to accompany your video.
Ane form of audio would exist simple narration – recording your voice reading a script to play with a video clip or a sequence of video clips.
Recording Audio on a Digital Video Camera
You can practise this with a digital video camera – putting the lens cap on then using the born microphone or an attached handheld microphone to record your voice narration. Then yous tin import the blank video and the sound rails by connecting your camera to your computer and capturing the unabridged video/audio clip in iMovie, then separating it into a split blank video track and a separate audio track (and simply deleting the one-time, leaving simply the audio track).
Recording Sound on Your Computer
Or y'all can record your sound narration through a microphone attached to your computer and import that directly into your iMovie.
To do that, in the Viewer area click on the betoken in your movie where you desire to add together the sound.
Then click on the Audio push button in the push bar at the lesser of the Shelf area on the correct.
Now click on the red record button to the right, and begin speaking into the microphone on your figurer.
When yous're done, click on the Terminate button.
Recording Audio on a Mini-Disc Recorder
You also can apply a mini-disc recorder to record your narration and transfer the audio to your computer using an audio editing plan similar ProTools. In these cases you'll create an sound file on your computer that you and then can import into iMovie.
To exercise that, in the Viewer area click on the point in your movie where you lot want to add the sound.
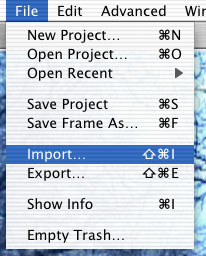 Then select File…Import in the carte at the peak of iMovie.
Locate the audio clip on your computer and iMovie volition import the audio.
You lot'll see your narration added equally a second audio runway in the Timeline Viewer expanse.
Importing Music from a CD
Finally, yous can import music from a CD.
To exercise that, in the Viewer area click on the point in your movie where you desire to add the audio.
Then select File…Import in the carte du jour at the top of iMovie.
Locate the audio prune on your computer and iMovie will import the music audio.
You'll run into your audio added equally a second audio track in the Timeline Viewer area.
In all these cases, you then tin edit the audio, such as increasing or decreasing the volume.
Exporting Your Video
When your flick is consummate, you'll want to export information technology as a compressed QuickTime movie for use on the Web. See the tutorial Exporting Video for the Web.
About this Tutorial
This tutorial is based on lectures Ellen Seidler gave in multimedia skills classes at the UC Berkeley Graduate School of Journalism. It was written past Paul Grabowicz and edited and illustrated by Pamela Reynolds.
Republishing Policy
This contentmay not be republished in impress or digital form without express written permission from Berkeley Advanced Media Found. Please see ourContent Redistribution Policy.
© 2022 The Regents of the University of California
Source: https://multimedia.journalism.berkeley.edu/tutorials/imovie/
0 Response to "How to Start Editing Again on Imovie"
Postar um comentário